Dragon Jagdpanzer IV L/70 early production
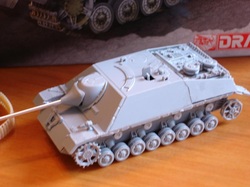
After high recommendations of Dragon kits I finally got round to buying one. The kit was a 1/72 scale Jagdpanzer IV L/70 Early Production. It was a huge kit with over 140 parts. This kit would be hard. Scanning the parts, I was impressed with the quality of the mouldings. There was a lot of great features too, one of which was the metal barrel this was highly detailed and I am amazed the kit had one as it was a small scale kit. Amazingly there more offerings these were a few photo etch parts and Dragon DS tracks which are highly detailed because of all these features this is one of the best kits I have seen.
Building
The instructions are simple to read and understand which is nice. As usual the kit starts at the bottom with the wheels, each set had five pieces and fit together superbly onto the one piece chassis. Next the turret or what you could call a turret is put together and the engine cover. With the engine covers you have a choice between a one piece set or making your own and putting the tools on. Because I wanted to save time I chose the one piece one. In step six the gun is made the system for side to side is good but not up or down. Finally the whole tank is put together. It is a great kit but definitely not for beginners as some of the parts are tiny.
Painting
The camouflage I chose was from the 9th Pz.Div, Hungry. Unsurprisingly the colours are Germany’s usual sand, green and brown. In Humbrol colours this is 93 desert sand, 86 light olive and 160 German camouflage brown. First I did a under coat of 93 desert yellow. Then some highlights with 24 trainer yellow. Next I added the camouflage pattern with a large brush one colour at a time and touching up with a fine brush, but as each camouflage pattern various you don’t have to touch up until it is exactly the same as the picture. Meanwhile I painted the tracks 53 gun metal which you have to cover every centimeter of because they came painted sandy yellow colour whose stupid idea was that? Once the paint had dried on the tank I painted the tools. Then the decal went on. This Dragon kit is brilliant and I would recommend it to any experienced modeler.
By Andrew Besuyen age 12

